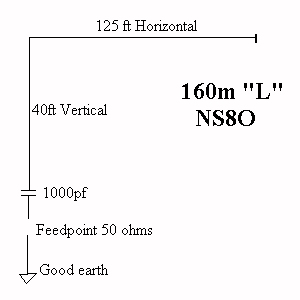
Monday, February 14, 2011

Active Antenna for AM/FM/SW

Active Antenna for AM/FM/SW

This simple little circuit can be used for AM, FM, and Shortwave(SW). On the shortwave band this active antenna is comparable to a 20 to 30 foot wire antenna. It is further more designed to be used on receivers that use untuned wire antennas, such as inexpensive units and car radios.
MPF102/NTE451 - N-Chan JFET

Parts List:
R1 = 1M
C1 = 470pF
C2 = 470pF
L1 = 20uH to 470uH (see text)
Q1 = MPF102, 2N4416, or NTE451


A KIT is available and may contain any value uH for L1, between 20uH and 470uH, to get you started. Change this value to suit your needs.
Parts only, no pcb: [Parts KIT]


L1 can be selected for the application. A 470uH coil works on lower frequencies and lie in AM, for shortwave try a 20uH coil. The KIT is supplied with a value whatever is available up to 500uH. The color code for L1 is generally yellow-violet-brown for a 470uH type but still this can vary by the type of inductor.


This unit can be powered by a 9 volt alkaline battery. If a power supply is used, bypass the power supply with a 0.04uF capacitor to prevent noise pickup. The antenna used on this circuit is a standard 18-inch telescoping type, but a thick piece of copper, bus-bar, or piano wire will also work fine.


The heart of this circuit is Q1, a JFET-N-Channel, UHF/VHF amplifier in a TO-92 case. Although many different types of FET's may be used--such as the MPF102, or the 2N4416--bear in mind that the overall high-frequency response is set by the characteristics of the FET amplifier. The direct replacement for the MPF102 is the NTE451. Second runner up is the 2N4416.


Output is taken from jack J1 and run to the antenna-input of your receiver.
Although this little circuit can easily be mounted on a piece of vero-board, I have supplied the printed circuit board and layout diagram if you wish to make your own.


Active Antenna PCB Active Antenna Lay-out

INVERTED VEE DIPOLE


The length of the antenna is calculated from the equation:

L ft = 468/Freq Mhz.

G3PTO 50Mhz 6 Element Yagi


I built this antenna when the 50Mhz band first became available to UK amateurs. It proved to be a winner, but beware it is a big antenna and needs to be constructed like a battleship or it will not survive the high winds. Mine managed to live through a hurricane of 105mph, next door house lost his roof.

To give some idea of it's performance, I worked all continents and perhaps the very best was to KG6 on the Island of Guam, in the Pacific, this was with 3 watts cw, I received a 559 report.

Give it a try, the 50Mhz will soon be bursting into life on the new sunspot cycle.


Effective HF Mobile Antennas


Keith WB2VUO

One of the problems with HF mobile operation, especially on 160, 80 or 40 Meters is antenna efficiency. The problem has been addressed in numerous publications for years, including, but not limited to the ARRL "Mobile Manual", the ARRL "Radio Amateurs Handbook", Editors & Engineers "Radio Handbook" and many others. If you are operating below 21 MHz,it is all but impossible to run a full-sized mobile antenna, so some sort of loading coil(s) will be needed.

Loaded antennas fall into three categories, Base-Loaded, Center-Loaded and Continuously-Loaded. The Base-Loaded antenna is the easiest to construct with the tools available to the "average" ham, but shows a lower efficiency than the other designs. Working with an 8-foot whip, typical of the stainless-steel whips sold for 11 or 10 Meter operation, a loading coil with an inductance of 1.1 uH to 350 uH would be needed for the 160 - 12 Meter bands, the lower the frequency, the larger the coil.

The radiation resistance of the 8-foot whip falls in a very low range, running from 0.08 ohms on the 160 Meter band to 16.1 ohms on the 12 Meter band as shown in the table below. If you have an ATU with a wide enough range, you COULD feed the whip directly with the ATU through a VERY short connection. At least one company (SGC) makes a mobile antenna system that does just this, mounting the ATU in a weatherproof box right at the antenna. It's kinda pricey though, running more than the price of some rigs. But, it CAN be done, 17 - 12 Meters for sure, and maybe even 20 Meters.

Now, the feedpoint impedance will NOT be the same as Rr. Ground losses, feedline losses and so on have to be factored in. The 10 Meter value is a good example for this point. An 8 foot whip, mounted to the average car/truck will show a feedpoint impedance of 30 - 45 ohms in the real world, and an acceptable SWR even without the use of an ATU. Mucho DX has been worked on the 10 Meter band with nothing more than this 8-foot whip, and before the advent of solid-state gear, the SWR was almost never considered. For that matter, my first HF mobile (a Heath HW-100) would handle a 3:1 load with the "stock" Pi-Net tuning. Tube rigs are/were very forgiving for loads.

Here's a "sketch" of a Base-Loaded mobile antenna:

The base loading coil has to be mounted on a strong enough mount to take the normal flexing seen during mobile operation. Typically, the spring for the whip mount would be above the coil, allowing the whip to move without putting undue stress on the coil. Some commercial coils from the 50's had a bandswitch on coil allowing one to switch between the taps on the coil quickly.

Here's a "sketch" of a Center-Loaded mobile antenna:
(The "Bugcatcher is a Center-Loaded antenna)

Typically, the bottom section is made of a larger diameter rigid section of tubing EMT, also known as conduit, makes a rugged makes a rugged bottom section, and the heavy galvanizing not only protects it from the elements, but allows one to solder directly to it for an improved connection. The zinc in the galvanized coating is a moderately good conductor, having a conductivity of 26 - 32% IACS. Copper, for comparison, has a conductivity of 100% IACS. Only silver is better.

While pure aluminum has a conductivity of 61% IACS, the common alloys are in the 28 - 35% IACS conductivity range, so galvanized steel is very close to aluminum for RF purposes, and is much stronger (but also much heavier). For RF applications, only the zinc coating need be considered due to the skin effect.

NOTE: The "Hat" is a capacity hat, and is optional. It WILL greatly improve the performance on the 160 - 40 Meter bands as it reduces the size (and losses) of the loading coil.

THE G3BGR MAGNETIC LOOP


Article originally Published in SPRAT Summer 1989 Issue Nr 59


This ia a home built Magnetic loop antenna which was used by G3BGR, indoors on 7,10 and 14Mhz. The basic idea was in Radcom 1986

A 10 ft length of 5/16in copper tube gives a 39in diameter loop. The Gamma match is 12in of 1/8in wire spaced 1in from loop The ends of the loop are terminated with a 75pf variable capacitor and a 20pf variable to act as fine tuning.

No Antenna Matching Unit was necessary and a good match was obtained on the three bands.

6m (50Mhz) Long wire antenna


There is another form of long wire antenna which provides uni-directional coverage and is easy to build.


Here is the description.

From the transmitter or transceiver, you go to an antenna tuner via coaxial cable. The tuner is placed at the base of the antenna, not at your operating position.From the tuner's single ended output comes a wire that first goes STRAIGHT UP for about ONE WAVELENGTH at 50 mHz...

Then the wire is bent and slopes VERY GENTLY in the direction of the desired coverage, You want the wire to extend itself for no less than 5 wavelengths, although shorter versions work quite well too, but are not SO DIRECTIONAL.

The wire SLOPES until it ends at a height of about ONE TO TWO METERS ABOVE GROUND.... There you tie it to a small mast... THEN.... tied to this small mast you need to place no less than 3, and much better 5 one quarter wavelength radials , that act as a counterpoise... The radials will kindly help to hold the small mast in a vertical position... You can use very small insulators for the radials, or tie them with dacron or nylon lines ( I prefer to use dacron lines similar to those used for sailboats ).

REMEMBER to aim your antenna to SLOPE in the DIRECTION that you want to communicate with....It shows a gain of no less than 5 to 6 dB over a horizontal dipole when the wire length is about 30 to 40 meters....

160 metre "L" Antenna


One of the problems with short, low antenna's on 160 metres is that their input impedance is very low, usually on the order of a few ohms. A clever trick to overcome this is to intentionally make the antenna to long. This will make the resistance increase, but also add inductive impedance. Simply add a series variable capacitor to tune it out.

160m L ant

I use an "L" shaped antenna on 160 and have had very good results. It is a total of 165 feet long and shows an impedance of 50 ohms+j88. It is not necessary to know any maths or have an expensive impedance bridge to use this antenna. Just make the capacitance variable and you'll be in the ballpark.

Adjust with a SWR meter, cut and try adding or subtracting the length. Its not critical at all. The horizontal part can be routed just about anywhere. Try to make the vertical part as high as possible.

For the ground Iv'e tied everthing together, furnace ducts, ground rods, house ground, dogs chain (just kidding !), and radial system, with braid from RG8/U.

7 MHz VERTICAL ANTENNA


The secret with this antenna is to install as many radials as you can around the base of the antenna, they can be anything from 1/8 wave or longer. All you need to do is to cut a slot in the lawn and push the radials down, then close the slot, the grass soon covers up the wound, especially here in rainy South West England. I have managed to get around 500ft of radials in a garden of 30ft by 19ft.


Try and keep the antenna away from buildings and dont expect good results on contacts up to 1000 miles, after that distance, the antenna really starts working well.

GROUNDPLANE ANTENNA


This is the antenna I have found to be the most effective limited space radiator that I have ever used.

The main requirement is to get it positioned in the clear, away from buildings if possible. Having said that, it is possible to hang a groundplane from the limb of a tree, this also works very well. The diagram below shows the basic design:


The Formula for calculating the length of the Radiator is given by:

L in feet) = 234/(Frequency in Mhz)

There is a school of thought which holds the view that the RADIALS should be 5% longer than the Radiator, but I have found, together with others, that the Radials should be the same length as the Radiator.

SHORTENED DIPOLE


     The

To construct each side of the antenna proceed as follows. Cut a 10.25 metre length of 24/0.076 insulated wire, and a 160 mm length of 40 mm o.d plastic tubing ( white plumbers tubing). Measure a 2.75 portion of the wire and attach the wire to the plastic former. Wind 40 turns of the wire onto the plastic former, and firmly secure the end of the winding. Make the other half of the antenna in the same way. Attach the ends of the 2.57 metre sections to a suitable centre insulator, which should also mount the choke balun, connect the 50 ohm coax, then carefully waterproof the whole assemby.

The choke balun uses RG174AU coax and a 40mm Ferrite Toriod. Once the antenna is errected adjust it to resonance on 7.030Mhz by folding back the ends, and adjust the length to provide minimum SWR.

Folded dipole

The folded dipole has several interesting features.

  • A two wire folded dipole can increase the characteristic feed impedance of a dipole and offer a good match to 300 Ohm balanced feed line.

  • A three wire folded dipole can increase the characteristic impedance of a dipole and offer a good match to 450 Ohm or 600 Ohm balanced feed line.

  • Offers a better match over a wider band, which can be important on the lower frequency bands.

  • When fed with a balanced feed line, and an antenna tuner, it can be run on multiple bands. This assumes that it is 1/2 wavelength long at your lowest operating frequency.

The drawing below shows the essential elements of a folded dipole. It consists of two parallel elements having a constant spacing s. These elements can be anything from simple wires to copper or aluminum tubing. The bottom element is split in the center and serves as the feedpoint. The upper element has a diameter d2 and the bottom element has a diameter d1. The ends of the elements are connected to form a continuous loop from the feedpoint.

The relationship of those three dimensions, (s, d1, and d2) creates a impedance transformation at the feedpoint that is described by the equation on the right. The Ratio, when multiplied by the standard dipole feed impedance, describes the folded dipole feed impedance.

Design Data

In the text areas to the right, enter your initial design information. Enter your expected frequency of operation, the antenna velocity factor, and the nominal feed impedance of a simple dipole.

The velocity factor is to adjust for the fact that the propogation of energy in a wire is a little slower than in free space. The value is based on the length to diameter ratio and defaults here to 0.951. Larger diameters may require you to adjust this value slightly higher.

The folded dipole multiplies the normal feed impedance of a simple dipole. For a 1/2 wave dipole, in free space, this is approximately 72 Ohms. You may not be dealing with a dipole in free space, but 72 Ohms is close enough to start with. You can adjust it to other impedances in the appropriate text box below.

Then enter the dimensions for your folded dipole antenna. If you make the diameter of both radiator elements, d1 and d2, equal the transformation ratio will be 4. This should transform the 72 Ohm simple dipole feed impedance to about 288 Ohms. You should note that, when the two diameters are equal, the distance s does not change the transformation ratio. Use the text areas below to enter diameters of each element and the distance between them. You can enter the the data in any dimension you like. You can even mix and match. Output data is presented in both US/Imperial and Metric dimensions.

Center-Fed Half-Wave Dipole


A Center-Fed Half-Wave Dipole is probably the simplest of antennas to construct and use. It is usually suspended between two supports, from it's end insulators, and has the feedline hanging from the center. The drawing below shows the esential parts of a dipole. A good wire to use is a #14 or #16 stranded copper wire, for flexability and to minimize weight. Needless to say, the end-insulators, center-insulator, and the wire need to be fairly strong, especially when you are dealing with low frequency antennas due to their length.

The recommended height for a dipole is 1/2 wavelength above ground. Finding two supports at the recomended height may be fairly easy for higher frequency antennas (15 and 10 Meters), but may present a problem at lower frequencies (80 and 40 Meters). At low frequencies, like 40 Meters, you would need two vertical supports that are 65 Feet (20 Meter) high to meet the recomended height. But, don't let this bother you too much. Lower heights will reduce the feed impedance and change the radiation angle, diminishing the overall effectiveness of the antenna, but the antenna will still be very usable.

The 1:1 Balun, pictured in the drawing, is a device that transforms a balanced transmission line to an un-balanced transmission line. The feed point of the antenna is balanced but the coax is un-balanced. Connecting the coax directly to the antenna feed point will work but you may experience feedline ratiation and have trouble obtaining a good match at your transmitter.

The simplest of Baluns is known as a Choke Balun. It doesn't really do a good job of transforming from a balanced to an un-balanced condition but it does provide a good degree of isolation to keep the feedline from radiating. This type of balun is constructed from 8 to 10 loops of coax with a diameter of about 8 to 10 inches. Bind the turns together with electrical tape or UV stabilized tie wraps.

Choke Balun

Ferrite Balun

There are also commercially available Baluns. These are usually very well made and provide for strain relief of the radiator elements. Some provide an attachment at the top that can be used for hanging. Internally, these are usually made from several turns of wire wrapped around a ferrite core. The usable bandwidth is very large making it useful from 3 to 30 MHz. The picture on the left is only and example of one type of commercial balun. They come in a variety of shapes and sizes.

Depending on your height above ground, you may not be able to obtain a 1:1 SWR, however, properly adjusted it should be some where between 1:1 and 1.5:1. Don't worry about a couple of tenths in your SWR, just get it as low as possible, and use it. The SWR will change anyway as you move across the band. The real point here is to just get the dipole up as high as you can.

The dipole antenna is really only good for use on one frequency band. Sometimes you can use it on it's third harmonic, in a pinch. For example, a 40 Meter Dipole is usable on 15 Meters, but the SWR may not be as good. For multi-band operation see the sections on Trap Dipoles or Fan Dipoles.

The formulas on the right can be used as a starting point for a center-fed half-wave dipole. It's a good idea to cut your wire a few inches longer than the calculated values to allow for securing to the insulators and final adjustments. The length can then be changed incrementally for the best match. Enter your required center frequency in the box on the right.

Simple antenna for 40 Meters

Making a simple antenna for 40 Meters is not very difficult. That is, if you have the space. A standard center fed dipole dipole for 40 Meters needs around 67 Feet of space. But, what if you only have space for a 20 Meter dipole, 33 Feet? If this is case, than you have several options.

  1. You could just forget about 40 Meters and work the higher frequency bands, 20 Meters on up.

    What? And miss out on all the fun dodging the the short wave broadcasters in the evening.

  2. You could create a Inverted-V type of antenna and raise the feedpoint on a mast.

    This is a possible alternative, but for this particular case, you would need a 28 Foot center mast and the apex angle would be less than optimum. This may cause some signal cancelation and give you a radiation pattern that you don't want.

  3. You could shorten the dipole arms to fit the space and use a loading/matching coil in the center.

Item number 3 is what this page is about. Jact Sobel, W5VM (which is now assigned to Vernon Dyer), had at one time described a shortened dipole center fed with a loading/matching coil at the feed point. A drawing of which is below.

Initially, this seems to be a different approach than the shortened dipole designs, detailed on my Short Dipole page. But it's really not. If you tilt your head, and cross your eyes a little bit, you might start seeing it as two coils, very close together. In fact, the coils are so close to the center, that they touch..

Assuming that the two coils are an equal number of turns, and that the wires attached to each side are equal in length, the center of an antenna should be a zero current point. this makes a handy place to tie your coax shield. You could wrap several turns of wire around the coil in the center and feed it that way. But I couldn't begin to tell you how many turns to use or what the feed impedance would be. Each turn of the coil, as you move away from center, provides you with a different impedance and a possible match. By attaching the center of your coax to one of the coils turns, you should be able to find a good 50 Ohm feed point. This then gets around the balanced to unbalanced conversion effort (balun), that would be required and you were center feeding or link feeding..

Each element arm is 18 Feet 6 Inches (5.029 M) long. The loading/matching coils consists of 30 turns of 12 SWG enamelled copper wire wound on 2.5 inch (63.5 mm) diameter PVC tube 6 inches (152.4 mm) long. The winding pitch should be about 6 turns-per-inch (25.4 mm). Although the picture doesn't show it very well, the shield of the 50 coaxial cable is connected to the center of the coil. The coax center conductor is connected to a point 2 or 3 turns away from the center, to a point which gives the lowest SWR. This point may take some experimenting, depending on which section of the band you wish to operate in.

¼ wave Mag Mount as a Portable Antenna


If you need to operate portable and only have a mag mount antenna available, try placing any large piece of metal underneath it. This might be a refrigerator, stationary car, or a metal rain gutter. You might also try making your own portable ground plane by placing some aluminum foil over a large piece of cardboard
( 2 feet x 2 feet minimum).

300 ohm TV Twin-lead J-Pole Antenna (Approximately 3 dB Gain) This is an easy antenna to make from existing or inexpensive materials.  It rolls up for easy storage and can be deployed in seconds; just hang from the nearest ceiling or attach to the end of a fiberglass fishing pole or PVC pipe. 

¼ wave Mag Mount as a Portable Antenna

If you need to operate portable and only have a mag mount antenna available, try placing any large piece of metal underneath it. This might be a refrigerator, stationary car, or a metal rain gutter. You might also try making your own portable ground plane by placing some aluminum foil over a large piece of cardboard ( 2 feet x 2 feet minimum).

Simple Ground Plane Antenna For PMR446


Here is a design for a 446 Mhz band outside aerial with ground planes.
The aerial is built on a SO259 chassis socket, with small nuts and bolts to hold the ground planes on, after the ground planes are attached, and the vertical element is soldered in, it is worth putting Araldite over the ground plane bolts, so they cant work loose in high winds.

The whole assembly will fit into a piece of 1 inch/25mm plastic tube to allow it to be fitted to a mast, or other fixing. The plastic tube requires a few saw cuts down the top, so a jubilee clip can be tightened onto the coaxial PL259 plug. It is well worth using the better grades of low loss cable on the aerial. The aerial will be resonant about 446.2 MHz, but it would be worth checking with a VSWR meter before transmitting. I have used this design for years on 70cm band, and you will be surprised how well it works.

Brass brazing rod is really easy to solder, and easy to get.

162.5 MHz ground plane antenna


Materials Needed:

1 - 6" x 6" piece of aluminum

1 - 18 3/16" length of number 12 wire

4 - 18 3/16" lengths of 3/16" diameter aluminum rods

1 - SO-239 coaxial connector 


[text instructions]Antenna construction

Matched long-wire antenna

by RU3AEP

Building an efficient antenna is a big problem for an radio amateur in many cases. HF antennas, especially for lower bands, have large sizes and have to be mounted on a big height. In many places, especially in the city, there is not enough room to erect the full-size dipole or 'inverted V' for lower (160 and 80 m) bands. Also, large antennas cause a long feeding cable to be used, and this is not good in terms of cost and construction: antenna with 'central' feeding should bear a weight of a cable, the feeder should be fixed somehow to protect all the system from strong winds, there is not always conditions to make whole antenna system suitable for the environment.

My situation.

When i started to think, what antenna to build for a top-band (160 m), i realized, that condition are too bad for it. I live in a 7-floor house, which has a roof with a high slope (about 35-40 degrees). Such roof is very dangerous to operate on it. Also, the house is almost completely surrounded by wide streets and electrical wires going along them. After long thinking, i concluded, that there is only one possibility to make an antenna - to hang up a long wire from my roof to the roof of another house. If i had built a dipole on that place, i would have had too many problems with the feeder. Any other places of antenna mounting were unacceptable from viewpoint of safety (antenna should never hang above electrical wires!!!, otherwise in case of fall down in may injury or kill you or somebody else and also cause severe electrical damage of the network and your equipment!) or from viewpoint of difficulty in mounting.

An old idea which is actual today for many city HAMs

Fortunately in that time i have read about one very old, but not frequently used antenna - so called Zeppelin-antenna with a matched feeding.  Classical design is presented below. As it can be seen, there is feeder with rather low impedance (~70-300 Ohm), and 1/4-wavelength matching line. From one end, this line is shortened, and here its impedance is just a zero (current is high, but voltage is low). Another end of this line is connected to the long wire, which has length exactly 1/2 wavelength. At this end, the impedance is very high (several kiloohms). That is why, a big voltage exists here during a transmission. Such impedance is quite suitable for a wire feeding, because a 1/2-wavelength wire has voltage maxima (high impedance) at the ends. The feeder from the transmitter with a specific impedance R(feeder) is connected to the matching line in the point, where impedance of the latter is equal to that of the feeder. Such point is usually located not so far from the closed end. If everything is done properly, feeder may have any length and SWR is closed to 1 in rather narrow band, central frequency of which is determined by the geometrical size of matching line and antenna.

Zeppelin antenna classical design

This design can be used almost without change, but instead of symmetrical feeder coaxial cable can be used to connect the whole system to the unsymmetrical output of the transmitter. The using coaxial cable has also additional advantages- it is almost insensitive to the environment, can be placed everywhere and is very flexible.

Such antenna with feeding 'from the end' is much more easy to make, that a simple dipole. Here, antenna conductor bears only itself, and this reduces the mechanical loading and thickness of the wire to be used. Also,  you may use your window as one the point of antenna fixing. In this case, all the cable will be inside the room and could be tuned precisely in comfortable conditions. If the beginning of antenna is outside the apartment, most part of matching line can be used as the continuation of the feeding cable. On the next picture there is a design, that i implemented for using on 160 m.

my 160-m antenna design

All coaxial cables have 75 Ohm impedance, the antenna wire, as well as two bearing wires are made from very hard bimetallic insulated cable (outer diameter is about 3 mm). The most tricky part - the connector between cable and antenna - is shown on the picture. It should be noted, that voltage on it is quite high, so everything should be well insulated from each other. It is good to place this connector somewhere indoors (not far from window/hole), otherwise rains and snow may cause decreasing of insulation efficiency. This antenna uses a tuned line made from the coaxial cable, and for proper operation of the whole system the antenna should have the length equal to the l*0.95/2, and the coaxial line must resonate on the working frequency. It is a good idea, to connect the shortened end of the matching line to the ground to provide adequate safety and to reduce possible TV/RF interference while transmitting.

Tuning of the antenna

To achieve what was declared in the previous paragraph, first of all the precise length of the matching line should be determined. Theoretically, it should be equal to  l/(4*sqrt(d)) (sqrt - SQuare RooT, d - dielectric constant of the insulator used in the coaxial cable). SQRT(d) value  is typically about 1.52 for most cables, that is why, 'shortening coefficient' is about 0.66 (1/sqrt(d)). But the practical value will be a little different from that.

The lengths indicated on the picture are mine values, and they can be used as the approximate reference. To make your line resonate on the middle of the band (1890 kHz), you have to make the line about 1 m longer, that indicated on the picture (for example, 24 m). Then, connect the 1-2 kOhm resistor to the end of the line, and the transceiver trough SWR meter - to the feeder. Put some power into line and watch the SWR. If the line is completely out of resonance, SWR will be closed to infinity, and no power will be dissipated on the resistor. Then the frequency should be found, which gives the sharp minimum of the SWR. It should be somewhere 1750-1800 kHz. Here, the SWR should be no more than 1.5. After the resonance have been found, the end of the cable should be cut carefully in several steps, watching the resonance frequency each time. By the cutting, the resonance will be shifted up. After you achieve the desired frequency, your line is almost ready, and you can mount the antenna in the chosen place. The minimum of the SWR in mounted antenna is usually 10-15 kHz down, compared to the value achieved by the tuning. If the SWR in minimum is too great - the point of the feeder connection should be varied to achieve acceptable value (it means redistribution of the cable between short and long sections of the line - not easy task).

When i made the antenna by the way described, everything was OK, and i had a minimum of SWR at 1875 kHz (about 1.3), on the edges of the band SWR increased to 2.2-2.5, since this antenna is a narrow-band one. Compared to my previous dipole, which hanged on the low height along the building, this antenna exhibited much better transmission efficiency and higher signal/noise ratio while receiving. But unfortunately, nothing lasts forever, and this is not an exception. Having read the next section, you probably will understand, which problems are encountered by the ham operator in a big city like Moscow.

SIMPLE WIRE ANTENNAS - A FEW THOUGHTS AND IDEAS

by
By Ron - 6Y5/4S7RO

During these hi tech days of Amateur Radio, some of us may feel a sense of inferiority that we do not contribute enough technically, to safeguard our identity as true Radiomen. It is also no secret that in recent times our hobby has evolved more into a talking hobby than a technical hobby. Although in comparison, the older hams did a lot of home-brewing, standards those days were different. In the good old days one could air a homebrew TX with a little drift, chirp, squeak and spectral impurity, and still be tolerated. Those were also the days when HF transmitters were commonly built on breadboards, and were heard on every neighbors radio and television set! Over the years, we allowed our hobby to be commercialized, and now the commercial equipment manufacturers have set new and high standards. No longer is it possible for the average Ham to build and air a home made transmitter without drawing cynical remarks or even be reprimand by the authorities

The good news is that even if we are not technically versed to build transmitters, we can all have fun building antennas, and still avoid being called push button operators or mere talkers over the airwaves! It is a nice feeling to get a flattering signal report from a DX station even when we run a Japanese rig because the rig would be useless if the antenna was bad! This enables us to claim some of the credit for a good, strong signal and for the great distances our signals are reported to have reached.

Getting Started:

A dipole fed with 75 ohm coax is about the easiest and most efficient out of simple antennae to build. However, like the commercial rig and the commercial antenna, one could quickly feel monotonous using a dipole. This is partly because we quickly begin to realize the performance limitations of the "no gain" dipole. Thus, begins the quest for a better antenna. This often is within the many constraints involved, as well as a hesitancy to build rotatable antennas with intelligent aluminum! Some fear seemingly elaborate matching networks and the monstrous sizes of monoband antennas. There is also the all important worry about towers and heavy-duty masts. So, why not a simpler and a cheaper (but effective) approach to "gain antennas"?

Many are the antenna handbooks, articles and websites covering antenna theory and specific practical designs. So, I shall make this a very informal discussion about the first steps involving the basic of basics!

The Wire YAGI:

The best and the easiest upgrade is to add a reflector or a director to an existing dipole, to make it a simple 2 element wire Yagi. To do this you will need either suitably spaced trees or in the case of upper HF band antennas, spreaders out of bamboo, wood or similar non-conducting material (it is a good idea to weatherproof them with common varnish or the more fashionable "polyurethane" sold in handy spray cans). Even though it is only a start, to avoid going deep into antenna theory, we shall stick to parasitic elements which are typically 5% longer (reflector) and 5% shorter (director) than the driven element. Usually, all you need to do is to space a director around .1 wavelengths in front of the driven element and/or a reflector .15 wavelengths behind the driven element. Once again, to the rocket scientist, these figures vary according to the design objective. However, I shall keep such finer points for another write up at a higher level!

The Influence of the Parasitic Element:

We need to understand that placing a director or a reflector on the same boom as the driven element will always LOWER the typical 75 ohms impedance of our existing dipole. Even though this can typically be anywhere from 50-25 ohms - depending on the spacing and tuning of the elements, a 2 element array with either a director at .1 or a reflector at .15 wave spacing will usually yield a good enough match into a 50 ohm coax cable. With the above arrangement even in the crudest form, one should easily be able to achieve 3-4 db of gain over a dipole. This is not only as good as increasing your power from 100 to 200 watts, but also concentrates that power within a narrower beamwith. It helps reduce fading and also RECEIVE better. A popular saying in ham radio is "if you cant hear them you cant work them!" If you wish to optimize forward gain by tuning the parasitic element or varying the spacing between the two elements, you may do so, but this will lower the impedance at the feed point (It also will not permit direct feed with 50 ohm coaxial cable).

Matching: (if you decide to optimize)

Matching problems can be overcome by using many well known techniques, but a simple hairpin match is recommend (see any good antenna handbook or email me at sparkrohan@yahoo.com if you need more details on hairpin matches). Hairpin matching a wire beam, also makes the antenna less clumsy than if you were to try a gamma match (which will also add a lot of downward strain on a wire element). As tuning of the driven element will have little or no effect on the gain of the array, do not be afraid to trim the driven element a few inches plus or minus from the formulae, to facilitate a good match. However, always remember that tuning the parasitic element has everything to do with the gain, directivity and the feed point impedance of the array.

The influence of spacing and element lengths on gain, front to back, impedance etc., is a vast topic that I do not have space to cover here. However, briefly, spacing elements close to each other reduces the feed impedance and increases the Q (reduced bandwidth) of the beam. Wide spacing reduces front to back, but provides good gain and lowers the Q resulting in greater SWR and gain bandwidths. One other point to remember is that maximum front to back does NOT mean maximum gain and is not always a good way to evaluate a beam. Maximum front to back and maximum gain also does not occur on the same frequency. The normal practice is to strike a compromise. When using modest levels of power, what is most important is forward gain.

LOOPS: (Deltas & Quads)

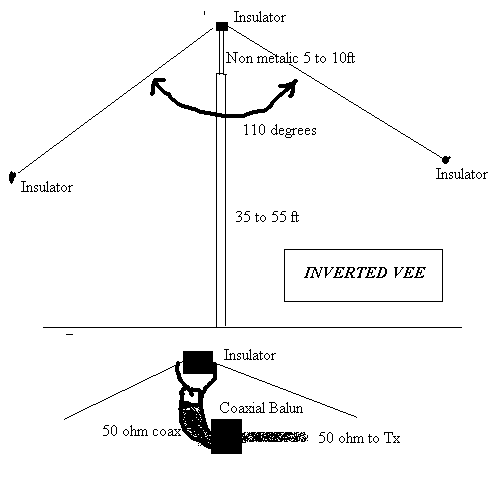
Another easy upgrade from a dipole is a single element delta or a quad loop. For those using an inverted vee, this becomes an easier task as it only involves introducing an additional half wave of wire and a base wire to the existing vee (imagine a wire pyramid). The existing feedpoint at the apex is better shifted to the center of the base or to one of its corners. It is said that a single element loop has a gain of a little over a db over a dipole. Since loops are said to radiate at a low angle, they work better at low heights compared to a dipole (although for ANY antenna the higher the better). Loops are also quieter antennas in that they pick up less man made interference.

As 4S7RO, the author worked pileups of Ws on 40m, running 100w into a loop, which had the base only 6 off the ground. From Jamaica, a single element sloping loop (which was sloping from 20 at the apex to 5 at the base) and a small IC718, brought the author 20m DXCC in just 2 months!

The formula for calculating a resonant loop is 1005/F (in MHz). I.e. 1005/14.2 = 70.77 One interesting point to remember is if you are using insulated wire, to further multiply the answer by a factor of .95. The formula for calculating the length of a director is 975/f and a reflector is around 1030/f.

The 2el Loop:

As with the 2 el Yagi above, an easy way of achieving excellent directivity and gain is to make a 2 element delta loop array, by suspending the elements off a nylon cord strung between two trees or other anchor points. You could also have one support and use a cross boom at the top. The many Coconut trees in Kerala (I call them Organic towers!) should provide ideal supports for making fine loop arrays. The author is reminded of a very successful 2 element 40m delta loop, where the loops were suspended off a bamboo pole placed horizontally and tied just below the "crown' of a coconut tree back in 4S7!

If the bottom of the loop is reachable from ground level one could easily switch directions manually by adding or reducing wire from the parasitic element. To do this you will need to use a driven element and a director slightly shorter than normal. At the middle of this director is a stub of wire with a shorting bar, where by you could change the length of the parasitic element to make it either a director or a reflector the length of the stub determines the tuning of the element as a director or a reflector- by making the element shorter or longer than the driven element. The technically inclined ham can also incorporate remote relay switching to achieve the above

if you use pulleys to haul up the loops, you can easily make predetermined element length changes even if the bottom is not reachable from ground level. However, as propagation to different parts of the globe is seasonal, one could even keep things simple by having a well tuned fixed direction loop array aimed in the direction of interest. Take a walk out to the yard, have a good look at your wire antennas and the trees around them - you might be surprised at the many possibilities that suddenly dawn on you. With a bit of ingenuity the possibilities are numerous.

Matching Loops:

Direct matching a delta loop into a coax cable is not always as easily done as with a wire Yagi. Practical measurements indicate impedances between 90-120- ohms, depending on height above ground and enclosed angles. If you are lucky, you will get a decent match into a 75 ohm cable, or else have to live with an SWR of over 1.5, using our standard 50 ohm coax. With single and two element loop antennas, I prefer to use a simple wave coaxial stub/transformer to match the array for 50 ohm feed. This is easily done by measuring a wavelength of 75-ohm coaxial cable at the operating freq and multiplying it by .66 (a typical velocity factor for commonly available 50 and 75 ohm coax cable). Connect one end of the 75-ohm cable to the feedpoint and the other end to a 50-ohm cable (any convenient length) that feeds the TX. This method will always result in a very good SWR when using a single or a 2-element loop array

In conclusion, I also wish to make a brief mention of the wire Moxons rectangle. This is an interesting variation of the wire Yagi antenna with folded back elements. Practical tests and computer simulations have indicated that it has gain only a fraction less gain than that of a conventional full sized Yagi. It uses shorter horizontal element lengths, yields a high front to back ratio and provides a PERFECT direct match into a 50 ohm coaxial cable. To the active hams who have heard/worked me, it should suffice to mention that I use a Moxon on 40m! The Moxons rectangle was originally designed by Moxon/G6XN, but greatly improved, remodeled and popularized by L.B.Cebik/W4RNL.

I hope this has given you a simple insight into antennas in the real world. Much can be written, but this is a start. If sufficient interest is shown, I shall be glad to write a series on practical design and construction of HF and VHF antennas. In the past few years my focus has been on compressed antennas for the apartment dweller. However, my antenna interests range from 160m-VHF! I also enjoy computer design, simulation and optimizing of all forms of antennas. If any of you would like to carry this discussion further or add to this, please feel free to email me at sparkrohan@yahoo.com and share your real world antenna experiments and experiences!

In conclusion, I wish to remind the Gurus and the enlightened that the objective of this article was to provide the beginner with ideas for a few effective, but simple upgrades, whilst keeping language and theory as simple as possible. As there are many good antenna books out there, I figured that sharing my practical experience and knowledge would be a better way of getting the average Indian ham with a simple wire antenna, get started on the road to greater things!